

TL;DR:
- Proper surface preparation with isopropyl alcohol is essential for effective adhesive bonding when hanging prints. Using the correct method based on weight and wall type ensures secure installation without causing wall damage. Damage-free options like leaning frames, hooks, or picture rails provide flexible alternatives, especially for renters and textured surfaces.
Getting decorative prints onto your walls sounds simple until you are standing there with a crooked frame, a freshly chipped bit of paint, or a print that drops at 2am. This decorative print installation guide covers the full process, from choosing the right tools and preparing your surfaces to damage-free methods that protect your walls and your deposit. Whether you own your home or rent it, the steps here will help you hang prints confidently and make them look exactly as you imagined.
Table of Contents
- Key takeaways
- Your decorative print installation guide: tools and preparation
- Step-by-step methods for installing decorative prints
- Common mistakes and how to fix them
- Renter-friendly alternatives for damage-free display
- My honest take on getting print installation right
- Find the right prints at Frametheworld
- FAQ
Key takeaways
| Point | Details |
|---|---|
| Surface prep is non-negotiable | Clean walls with isopropyl alcohol before applying any adhesive product to get a proper bond. |
| Match method to weight | Use adhesive strips for lighter prints and French cleat systems for heavy or oversized frames. |
| Cure time prevents falls | After pressing adhesive strips, wait at least one hour before hanging to allow the bond to fully set. |
| Renters have real options | Leaning prints on ledges, using picture rails, and removable adhesive dots all avoid wall damage. |
| Removal matters as much as hanging | Stretch adhesive tabs straight down along the wall to remove them without pulling paint. |
Your decorative print installation guide: tools and preparation
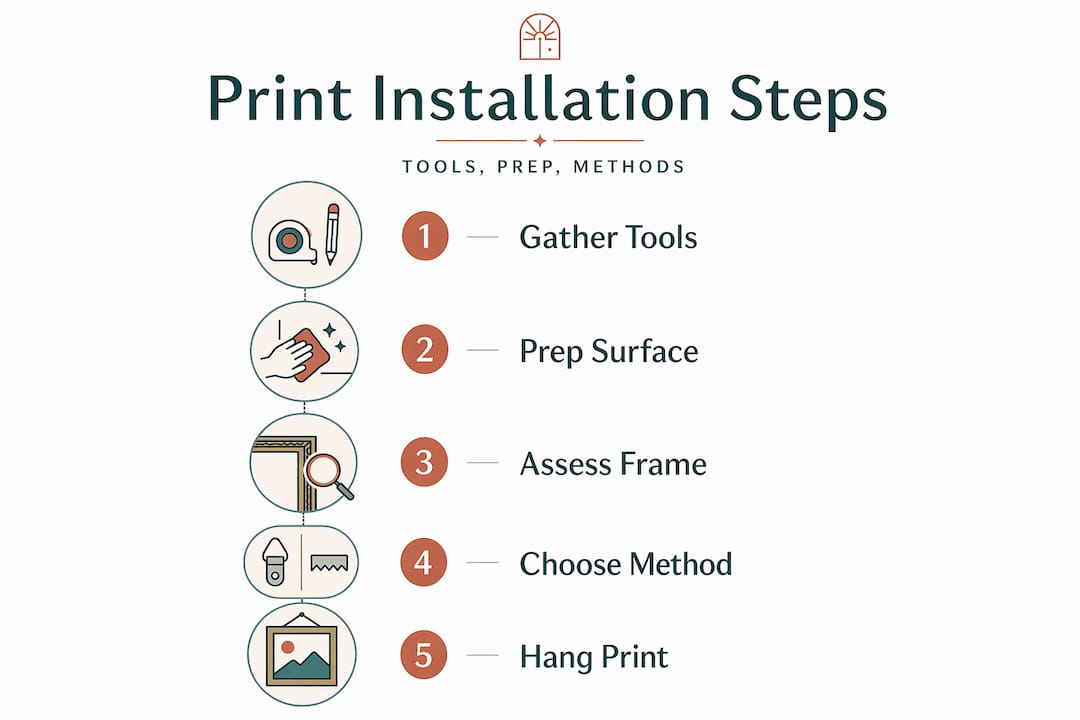
Before a single strip or hook touches your wall, you need the right kit. Rushing this step is where most installations go wrong, and it costs you far more time to fix afterwards.
The tools you actually need
Here is what to gather before you start:
- Spirit level or laser level for straight positioning
- Pencil for marking hanging points lightly on the wall
- Tape measure for spacing multiple prints evenly
- Isopropyl alcohol and clean cloths for surface prep
- Adhesive picture hanging strips (sized to match your print’s weight)
- Adhesive hooks for wire-backed frames
- French cleat system for heavy or large pieces
- Picture hanging nails or screws for solid wall fixings
- Stud finder if you are working with plasterboard walls
You do not need all of these for every job. A lightweight unframed print on a smooth painted wall needs only strips, a level, and a pencil. A large framed canvas over a fireplace needs a stud finder and a French cleat. Picking the right tool for the job is genuinely half the battle.
Preparing your wall surface
Proper surface cleaning with isopropyl alcohol is the single most important step before using any adhesive product. Household cleaners leave an invisible residue that stops adhesive from bonding properly, so even a freshly wiped wall can cause a strip to fail within days.
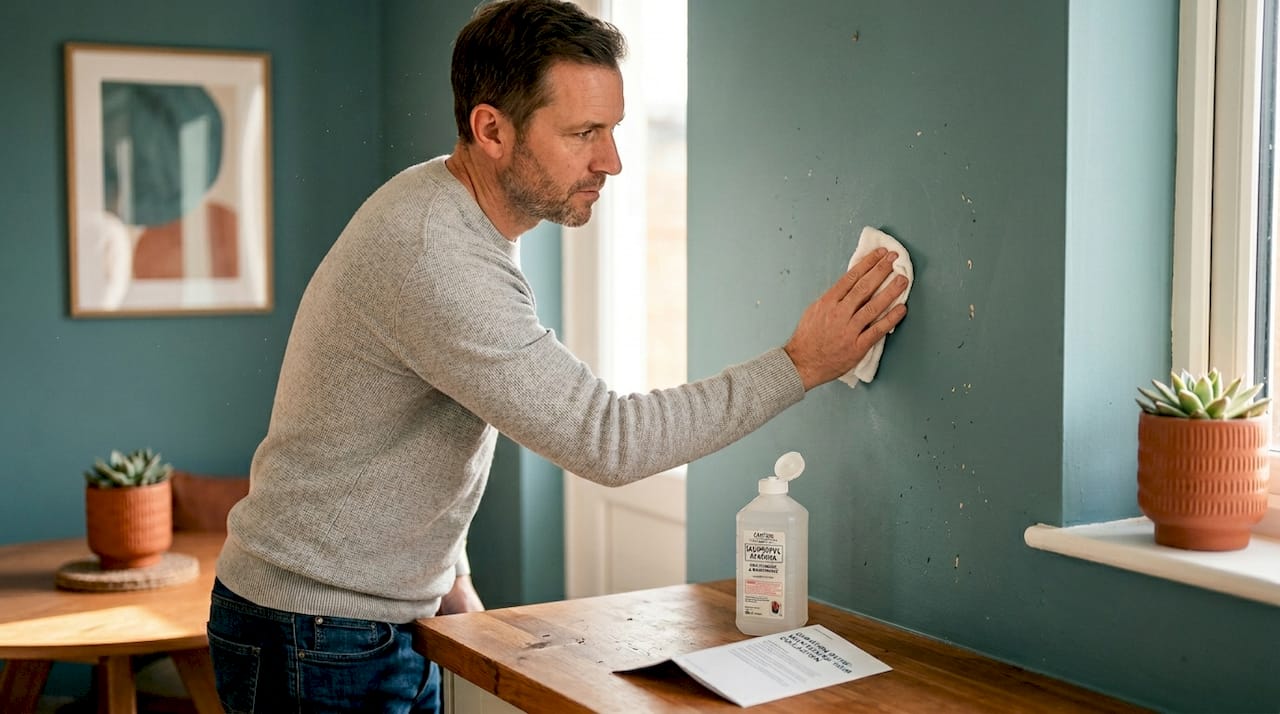
After cleaning, check the surface for texture. Adhesive strips and hooks need flat, smooth paint to grip. Heavy textured walls, bare brick, or surfaces with a glossy finish significantly reduce adhesion. If your walls are textured, skip to the renter-friendly alternatives section further below, where other methods will serve you much better.
Pro Tip: Run your hand flat against the wall after cleaning. If you can feel bumps or ridges under your palm, adhesive strips will not give you a secure hold regardless of brand or weight rating.
Assessing your print and frame
Before choosing a hanging method, weigh your framed print if possible, or compare it against the weight guidance on the packaging. Using the correct strip quantity relative to the frame weight is one of the most overlooked parts of decorative print setup instructions. Lightweight items under 500g work well with small strips, while anything heavier needs large strips or multiple sets positioned evenly around the frame.
Step-by-step methods for installing decorative prints
The method you choose depends on your wall type, your frame, and whether you need to avoid damage. Here are the three most practical approaches.
Method one: adhesive picture hanging strips
This is the go-to method for renters and anyone wanting a clean, nail-free installation.
- Clean the wall area and the back of the frame with isopropyl alcohol. Let both dry completely for at least a minute.
- Separate your strip pairs and press each set together firmly to activate the adhesive connection.
- Attach one side of each strip pair to the back of the frame. For most medium prints, use four strips placed near the corners.
- Press the frame firmly against the wall for 30 seconds, applying even pressure across the whole back surface.
- Pull the frame away gently from the wall to separate the interlocking strip halves, leaving one side on the wall.
- Press those wall-side strips firmly for another 30 seconds.
- Wait one full hour before re-hanging the frame. This is the step most people skip, and it is the reason most adhesive failures happen.
- Click the frame back onto the wall strips and check alignment with your level.
Pro Tip: If you are hanging multiple prints in a row, use a long piece of painter’s tape as a temporary horizontal guide line. Mark your hanging positions along it, then remove it cleanly before the final hang.
Method two: adhesive hooks for wire-backed frames
Many traditional frames have a hanging wire across the back. For these, a single adhesive hook placed at the correct height works well for prints under roughly 2kg.
Position the hook at the exact point where the wire, when slightly taut, sits at the height you want the top of the frame. Press the hook firmly onto the cleaned surface, wait the required cure time before loading it, and then lower the wire onto the hook. Use a level to check once the print is hanging, and adjust the wire length if needed for fine-tuning.
Method three: French cleat systems for heavy frames
For large canvases, heavy framed prints, or anything you want to feel truly permanent, a French cleat is the professional answer. French cleat systems support up to 300 lbs by spreading the load along the sloped cleat interface rather than concentrating it at a single point.
You screw the wall half of the cleat into a wall stud or use appropriate wall anchors, then attach the corresponding cleat to the back of the frame. The two angled pieces hook together, and the frame can be slid sideways for precise positioning. This is the method interior designers use for gallery-style installations because it handles weight, looks clean, and allows adjustment without re-drilling.
For more on how framing choices affect your installation, the wall art framing process guide from Frametheworld covers frame construction and weight considerations in detail.
Common mistakes and how to fix them
Even with the right tools, a few consistent errors cause most installation failures. Here are the ones worth knowing before you start, not after.
Skipping surface preparation. Adhesive strips need clean, dry, flat surfaces to perform as rated. Applying them to dusty, greasy, or freshly painted walls (wait at least a week after new paint) is a guaranteed failure, often within the first 48 hours.
Exceeding weight limits. Each package states a maximum weight capacity, and ignoring it does not leave much margin for error. A frame slightly over the limit might hold for a week and then fall on a warm day when the adhesive softens slightly. When in doubt, use more strips than you think you need.
Pulling tabs upward or outward when removing strips. Removing adhesive strips incorrectly tears paint. The correct technique is to slowly stretch the tab straight down along the wall surface, keeping it flat and close to the wall. The adhesive releases in a controlled way rather than yanking the paint off with it.
Hanging on textured or uneven walls. Standard adhesive products are not designed for rough or undulating surfaces. On these walls, switch to picture rail hooks, leaning methods, or wall putty instead.
If a print has already fallen and left adhesive residue, warm the residue gently with a hairdryer on a low setting for 20 to 30 seconds. It softens enough to peel away cleanly without additional damage.
What about crooked prints? Check whether it is the hanging point that is off or the frame itself. A spirit level held against the frame tells you immediately. For wire-hung frames, slide the wire slightly left or right on the hook to correct minor angles without re-drilling anything.
Renter-friendly alternatives for damage-free display
Not every wall is yours to drill into, and not every surface suits adhesive strips. These options keep your walls intact and still give you a proper display.
Leaning prints on shelves, ledges, or easels is one of the most stylish and flexible approaches available, particularly for larger or heavier pieces. A deep windowsill, a sideboard, or a dedicated picture ledge lets you swap and rearrange prints without touching the walls at all. This also suits renters who move often, since nothing is fixed.
Other damage-free options include:
- Removable adhesive dots for very lightweight prints or unframed art on card stock
- Wall putty (like Blu-Tack or equivalent) for poster-weight prints on smooth walls
- Velcro strips for prints you want to swap regularly; the loop side on the wall, hook side on the frame
- Picture rails in older properties, which often have original picture rail moulding that takes hooks without any drilling
- Freestanding easels for single statement pieces, particularly effective in living rooms and home offices
For a gallery wall without a single nail, combine picture ledges at two heights with prints of varying sizes leaned at slight angles. This works brilliantly in rental flats where the walls are smooth and the landlord is watching.
Pro Tip: Layer prints slightly in front of one another on a ledge rather than lining them up flush. The depth this creates makes even a modest collection look curated and considered.
For more ideas on creating impact without making permanent changes, the home decoration best practices guide from Frametheworld is worth a read before you start planning your layout.
My honest take on getting print installation right
I have seen more installation failures caused by impatience than by any wrong tool or poor-quality strip. Success with adhesive strips depends less on brand and far more on surface prep, correct weight matching, and cure time. That is the truth that most people learn the hard way.
My experience is that renters tend to under-prepare the wall and over-rely on the product doing the work. The product is only as good as the surface it is on. Wipe the wall, check the weight rating, wait the hour. Three steps, and your installation rate improves dramatically.
For heavy pieces, I would always choose a French cleat over multiple adhesive strips. The load distribution across the cleat interface is fundamentally more stable than several small adhesive contact points, and the ability to slide the frame left or right after hanging is a genuine practical advantage. You only need to drill twice for a cleat, and the result is something you can trust long-term.
The part I find most satisfying is when someone who assumed they could not hang anything in a rented flat discovers what leaning, ledges, and removable adhesive can actually achieve. Damage-free does not mean compromise. It often means more flexibility than a traditionally drilled wall ever gave you.
— Lennard
Find the right prints at Frametheworld
Once your walls are prepped and your method is chosen, the next question is what to hang. Frametheworld offers a beautiful Wabi Sabi wall art collection featuring hand-painted abstract textures and imperfection-led aesthetics that work brilliantly in modern and minimal interiors. These prints are available in a range of sizes, making it straightforward to match a piece to the space and hanging method you have already planned.
Beyond ready-to-buy collections, Frametheworld provides customisation options for bespoke sizing and framing, which is particularly useful when you are working with an unusual wall space or a specific interior scheme. The platform also serves professional interior clients, so whether you are decorating one room or an entire property, the range and support are there. Browse the full collection at frametheworld.co.uk and shop with confidence knowing exactly how your chosen print will go up.
FAQ
How do I prepare a wall for decorative print hanging?
Clean the wall surface with isopropyl alcohol on a clean cloth and allow it to dry fully. Avoid household cleaners, which leave residue that weakens adhesive bonds.
How long should I wait after applying adhesive strips?
Wait at least one hour after pressing the strips to the wall before hanging your print. This curing time allows the adhesive to fully set and prevents slipping or falling.
What is the best method for hanging heavy decorative prints?
A French cleat system is the most reliable option for heavy or large frames, supporting substantial weight by distributing load along the cleat interface rather than at a single fixing point.
Can I hang decorative prints without damaging walls?
Yes. Adhesive strips, removable adhesive dots, wall putty, Velcro strips, and leaning methods on picture ledges or shelves all allow attractive display without drilling or causing paint damage.
How do I remove adhesive strips without pulling paint?
Stretch the adhesive tab slowly and steadily straight down along the wall surface, keeping it close and flat against the wall. Pulling outward or upward is what causes paint to peel.


Leave a comment
This site is protected by hCaptcha and the hCaptcha Privacy Policy and Terms of Service apply.