
A custom art brief is a short document that tells an artist exactly what to create, for whom, by when, and for how much. It works only when it names the deliverables, technical specifications, timeline, budget and payment schedule, revision limits, and usage rights, alongside reference images that show the intended style. Miss any one of those eight fields and you’re inviting guesswork, delays, and an invoice you didn’t expect.
TL;DR:
- Clear technical specifications, including file formats, resolution, and color profiles, are essential to avoid costly reworks later in the project.
- Specifying usage rights upfront, such as personal, editorial, or commercial, significantly impacts the project’s cost and licensing procedures.
- Including detailed reference notes and annotated images helps ensure the artist understands which elements to replicate or avoid, reducing guesswork.
- Defining a precise timeline with milestones and a signed agreement helps prevent scope creep, delays, and disputes over project scope.
- A brief that explicitly states the final approver prevents delays caused by multiple stakeholders giving conflicting feedback.
Table of Contents
- What should a custom art brief template include?
- How do you write an art brief the artist can act on?
- What commercial terms belong in an art commission brief?
- How do you word usage rights in an art brief?
- What technical specifications does the artist actually need?
- What makes a reference image or moodboard useful?
- What mistakes cause the most rework in a custom art commission?
- What does a well-written custom art brief look like in practice?
- Why the best briefs are shorter than commissioners expect
- Starting a bespoke commission with Frametheworld
- Templates and guides worth bookmarking
- Sources
What should a custom art brief template include?
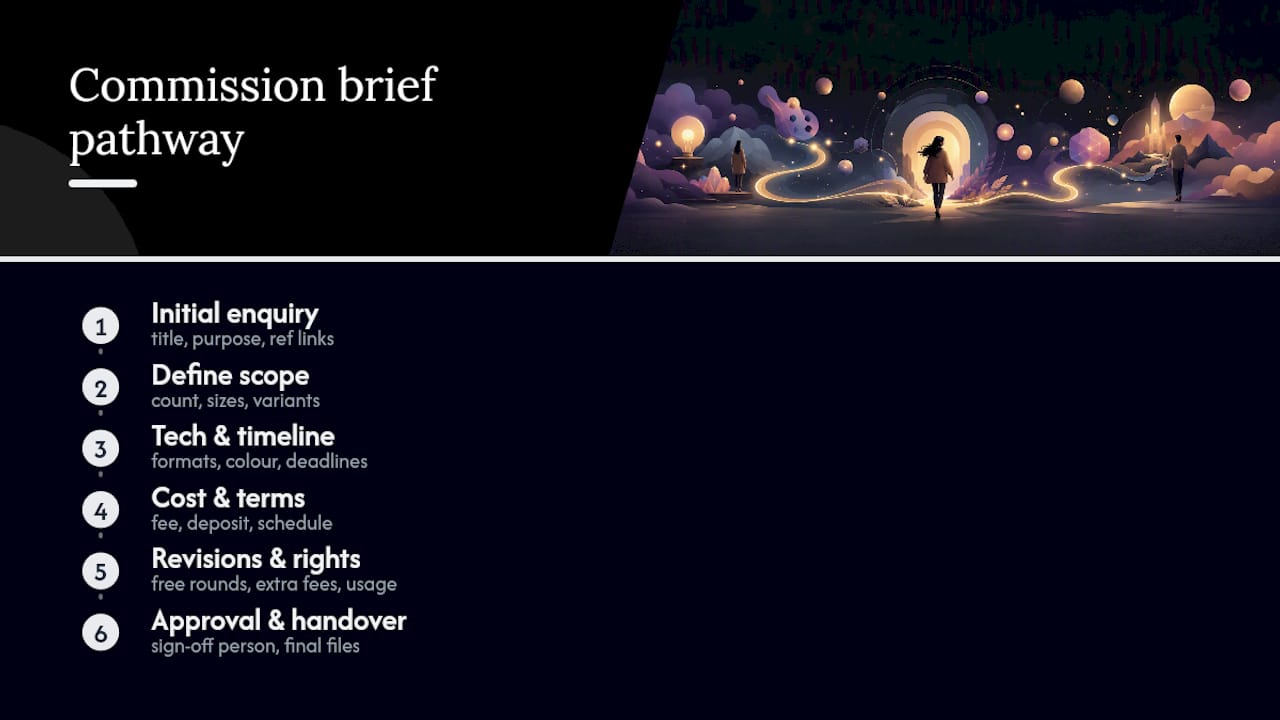
Every quote an artist gives is only as good as the brief behind it. Vague requests get vague estimates. A tight brief, on the other hand, lets an artist quote in one pass rather than three rounds of back-and-forth emails. The checklist below covers the fields worth pasting into an email, form, or shared document before you send anything to an artist.
Project title and overview — one line naming the piece, one paragraph on its purpose (a lobby feature wall, a gift, a branded print series).
Deliverables — how many pieces, in what sizes, and any variants (a cropped social version, a print-ready file, a framed original).
Technical specifications — file formats (PSD, TIFF, PNG), colour profile (CMYK for print, RGB for screen), and resolution in DPI or pixel dimensions.
Timeline with milestones — start date, a sketch or concept-approval checkpoint, and the final delivery date.
Budget, deposit and payment schedule — the total fee, deposit percentage, and when remaining payments fall due.
Revision rounds and extra-work fees — how many free revisions are included and the cost of anything beyond that.
Usage rights and licensing — whether the work is for personal display, publication, or commercial resale, since this changes both the price and the paperwork.
Reference links and a named point of contact — the person who has final sign-off, so the artist isn’t chasing approval from three different people.
A good illustration brief doesn’t need to be long. It needs to be focused enough that an artist can read it once and start sketching, which is exactly what a checklist format achieves better than a paragraph of prose ever could.
How do you write an art brief the artist can act on?
Writing the brief itself is where most commissioners freeze, mostly because they try to describe a feeling rather than a fact. Work through it in this order and the artist will have everything they need on the first read.
- State the objective in one sentence. “This piece needs to anchor a client reception area and feel calm rather than dramatic” tells an artist more than three paragraphs of mood-setting adjectives.
- Name the use case and audience. A commercial lobby piece and a nursery mural demand completely different colour palettes, scale, and durability, even if the subject matter overlaps.
- List deliverables before technical details. Say what you need first (one 120cm x 90cm canvas, plus a digital file for the website) before you get into file formats.
- Attach annotated references. Don’t just link three paintings you like. Say which element of each one you want (the colour palette from image one, the brushwork from image two) and flag anything you actively dislike.
- Decide when to call versus when to keep it written. A quick call helps for tone and rapport, but sending a written brief even after a call keeps both sides accountable to the same details.
Pro Tip: Never send a reference image without a note attached. “I like the movement in this one, but not the palette” takes ten seconds to write and saves an entire revision round.
What commercial terms belong in an art commission brief?
Money disagreements almost always trace back to a brief that stayed vague on payment. State the numbers early and neither side has room to renegotiate mid-project.
- Deposit: commonly 30 to 50% upfront, which protects the artist’s time if the project stalls or is cancelled after work begins.
- Payment structure: either milestone payments (deposit, midpoint, final) for larger commissions, or a single deposit plus balance-on-delivery for smaller ones.
- Revision rounds: state the number included (two is standard) and the flat fee or hourly rate for anything beyond that.
- Cancellation terms: whether the deposit is refundable, partially refundable, or non-refundable once work has started.
- Written agreement: a signed form or e-signature confirming all of the above before any paint touches canvas.
Formalising these terms in a commission intake form rather than a casual email thread is what separates a smooth commission from a dispute six weeks in.
How do you word usage rights in an art brief?
Usage rights change the price of a piece more than almost any other field, yet they’re the one commissioners forget most often. An artist pricing a piece for your living room wall charges differently than one pricing a piece for a national ad campaign, because the licence, not the canvas, is what’s being sold in the second case.
- Personal use: the piece hangs in your home or office and is never reproduced or resold. This is the default assumption unless you state otherwise.
- Editorial use: the work appears in press, a portfolio, or non-commercial publication, which usually carries a modest licence fee.
- Commercial use: the piece is reproduced, sold as prints, or used in branding and advertising, which typically costs significantly more than the original artwork alone.
- Exclusivity or copyright transfer: rare, and priced accordingly, since it stops the artist reusing the design in their own portfolio or future work.
A simple clause works well: “This commission is for personal display only. Any commercial reproduction, print run, or merchandising use requires a separate licence fee, to be agreed before production.” That one sentence prevents a painful conversation later.
What technical specifications does the artist actually need?
Ambiguity here is what causes the most expensive kind of rework, because a wrong file format or resolution often means starting the export process from scratch. Specify these before the artist begins, not after they’ve delivered the wrong thing.
- Source files: ask for layered, editable files (PSD, AI) if you might need future edits, alongside flattened export files (JPEG, PNG, TIFF) for immediate use.
- Colour profile: CMYK for anything going to print, RGB for anything staying on a screen. Mixing the two produces dull, shifted colours on canvas.
- Resolution: at least 300 DPI for standard prints, higher for large-format murals viewed up close, and 72 DPI is perfectly fine for web or social use only.
- Asset naming and handover: agree on a simple naming convention upfront and confirm a final checklist of every file the artist owes you at delivery.
What makes a reference image or moodboard useful?
A reference image only helps when it isolates one quality, whether that’s a palette, a brushstroke, or a composition. Sending five unrelated inspiration images with no notes forces the artist to guess which parts you actually want, and guessing is expensive.
- Useful references show a single trait clearly: the texture of one painting, the colour scheme of another, the scale of a third.
- Annotate everything. Write “copy this palette” or “avoid this much detail” directly next to each image rather than assuming intent is obvious.
- Watch your sources. Be cautious with AI-generated reference images unless you’ve confirmed licensing, and lean on verified artist portfolios or clearly licensed stock instead.
- Share moodboards simply. A single shared folder or a basic moodboard tool works better than scattered links across three different messages.
Pro Tip: If two references contradict each other, say so explicitly and tell the artist which one wins. “I love the colours here but the composition there, prioritise colour” removes the guesswork entirely.
What mistakes cause the most rework in a custom art commission?
The gap between a mediocre brief and a strong one usually comes down to a handful of repeated errors, all of them avoidable.
- Vague language like “something modern and calming” without a reference or palette leaves too much room for interpretation, and interpretation is where budgets blow out.
- Missing technical specs mean an artist delivers a file that’s the wrong resolution or colour profile for your actual use case, forcing a costly re-export or repaint.
- Scope creep, adding “just one more element” mid-project without discussing price or timeline, is the single fastest way to sour a working relationship.
- Contradictory references sent without any hierarchy of preference leave the artist choosing blind.
- No named approver, so three people weigh in with three different opinions and the artist is stuck between them.
A thorough brief functions as insurance: the hour spent writing it upfront routinely saves several hours, and several invoices, in rework further down the line.
What does a well-written custom art brief look like in practice?
Seeing the fields filled in with real numbers makes the template far easier to adapt than reading the checklist alone.
Project: Reception wall feature, boutique hotel lobby. Overview: A calming abstract piece to anchor the seating area, coastal palette, no figurative elements. Deliverables: One hand-painted canvas, 150cm x 100cm, plus a high-resolution digital file for the hotel’s website. Technical specs: 300 DPI minimum, sRGB for the digital file, CMYK reference for the physical paint mixing. Timeline: Concept sketch by week two, client approval by week three, final delivery by week eight.
Revisions: Two rounds included; additional rounds billed at a flat rate. Usage: Personal and hotel-property display only; any marketing reproduction requires a separate licence. References: Three linked images, each annotated with the specific element to copy.
For a mural or site-specific commission, add exact wall dimensions and lighting conditions, considering the latest interior door design trends to ensure all elements complement the space seamlessly. For a digital-only piece, drop the physical specs and focus entirely on file formats and platform sizing. Frametheworld’s own commission process for site-specific artwork follows a similar structure, moving from concept sketch through client approval to final handover.
Why the best briefs are shorter than commissioners expect
Most people writing their first commission brief overcorrect toward length, assuming more words mean more clarity. The opposite tends to be true. The best briefs I’ve seen are the ones that say less but specify more: a firm deadline, an exact size, one clear reference, rather than three paragraphs describing a “vibe.”
The item commissioners forget most often isn’t the budget or the deadline. It’s the named approver. Projects stall for weeks not because the brief lacked detail, but because nobody could say who had final sign-off when two stakeholders disagreed.
[Author credentials and client commission case studies to be added.]
— Lennard
Starting a bespoke commission with Frametheworld
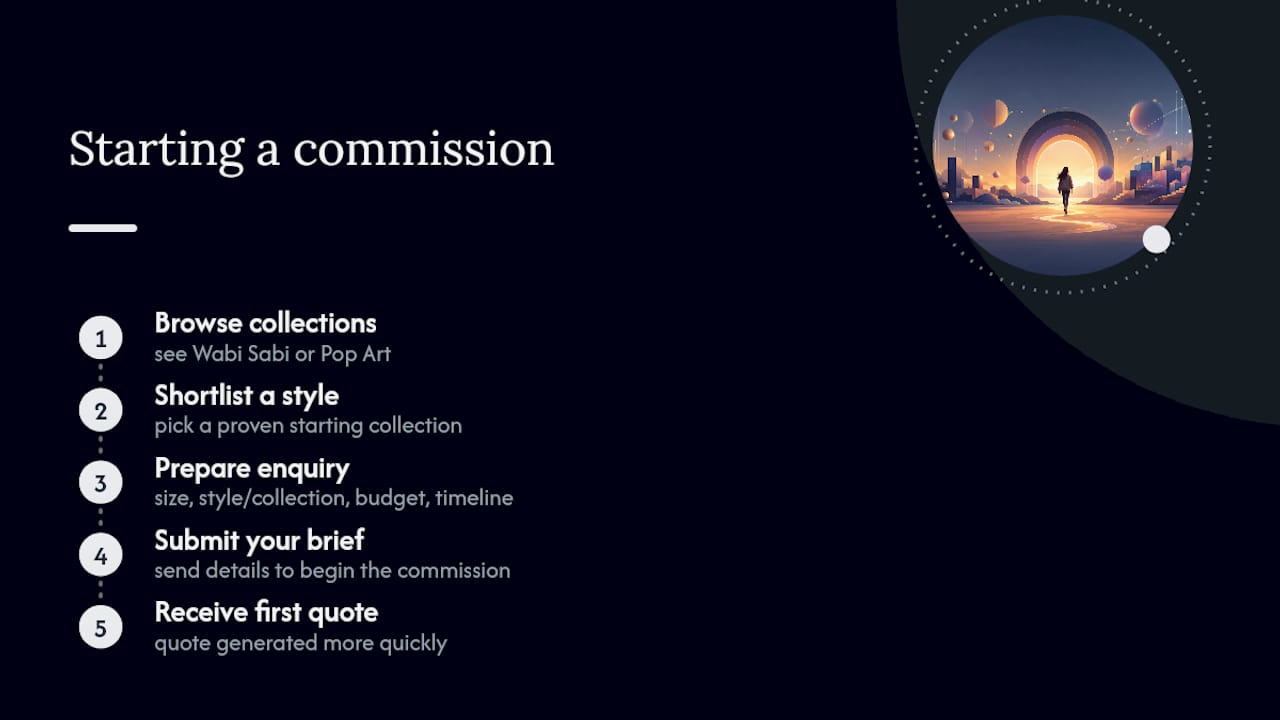
A custom-commission process should cover the exact fields this brief covers: size, style, palette, and finish, all matched to your space before any paint goes on canvas. Where a general commission can leave you negotiating specs from scratch, a process that starts from proven collections, such as the Wabi Sabi wall art range or the Pop Art collection, lets you adapt a known style rather than describing one from zero.
To start an enquiry, include your deliverable size, preferred style or reference collection, budget range, and timeline in your first message. This information helps generate a first quote more quickly. Browse the collections above to shortlist a starting style, then submit your brief details directly to begin your commission.
Templates and guides worth bookmarking
For the deposit, revision, and usage-rights fields, the Formester commission form template offers a ready structure. For phrasing objectives and deliverables, Illustrators.com’s illustrator brief guide breaks the process down step by step. Both pair well with the checklist above.

Leave a comment
This site is protected by hCaptcha and the hCaptcha Privacy Policy and Terms of Service apply.