

TL;DR:
- Art format sizing involves planning artwork, mat, and frame dimensions together to ensure compatibility and visual harmony. It emphasizes the importance of matching aspect ratios and understanding standard size systems across different regions to avoid costly mistakes. Proper calculation, digital preparation, and space considerations ensure artwork fits perfectly and enhances your interior design.
You ordered the print, bought the frame, and somehow it still doesn’t fit. If that sounds familiar, you’re not alone. Art format sizing, the process of matching your artwork’s dimensions to compatible mats, frames, and display spaces, trips up beginners and experienced creatives alike. The confusion usually comes from treating each element in isolation. This guide walks you through the full chain, from digital file dimensions to the final framed piece on your wall, so you can make confident decisions at every step.
Table of Contents
- Key takeaways
- What is art format sizing and why it matters
- Standard art format dimensions around the world
- Calculating your frame size from artwork and mat
- Preparing digital files for print
- Choosing the right size for your space
- My honest take on art format sizing
- Explore art sized for your space at Frametheworld
- FAQ
Key takeaways
| Point | Details |
|---|---|
| Size the whole chain | Artwork, mat, and frame sizes are linked; plan them together to avoid costly reprints or mismatches. |
| Match aspect ratios early | A ratio mismatch between print and frame causes cropping or empty borders; check ratios before ordering. |
| Apply the mat border formula | Frame size equals print size plus twice the mat border width, accounting for frame rabbet overlap. |
| Use 300 DPI as your baseline | Digital files need 300 DPI at the target print dimensions to produce sharp, gallery-quality prints. |
| Follow the 60–75% furniture rule | Artwork hung above furniture should span 60 to 75 per cent of the furniture’s width for visual balance. |
What is art format sizing and why it matters
Art format sizing is the practice of selecting compatible dimensions across the entire chain from your digital file or physical artwork through to the mat opening, frame, and finally the wall display. The Art Format Planner describes it as working backwards and forwards simultaneously. You might start from a target outer frame size and back-calculate the visible image area, or start from your artwork dimensions and calculate outward to find the correct frame. Either way, every measurement in the chain needs to agree.
The terminology can feel technical, but it breaks down cleanly:
- Artwork size refers to the visible image area, the portion of your print or canvas that will actually be seen once matting and framing are in place.
- Mat opening is the cut-out window in the mat board. It is always slightly smaller than your print so the artwork doesn’t slip through. The mat opening determines how much of your artwork a viewer actually sees.
- Frame outer size is the full external dimension of the frame, which includes the frame moulding width itself.
- Rabbet (also called the lip) is the small inner ledge of the frame that overlaps the edges of your mat or artwork by roughly a quarter of an inch. It holds everything in place but also hides a sliver of your image, which is worth factoring in from the start.
- Aspect ratio is the proportional relationship between width and height. Keeping this consistent across your print, mat opening, and frame prevents awkward cropping or empty borders on one side.
Pro Tip: Design your digital file to the mat opening size, not the nominal print size. This prevents important parts of your artwork from being hidden beneath the mat or frame lip.
Standard art format dimensions around the world
Not all sizing systems speak the same language, and that causes real problems when you’re ordering prints or buying frames internationally.
The ISO 216 standard underpins the A-series used across the UK and Europe. A4 is 210 × 297 mm, A3 is 297 × 420 mm, and each size up doubles the area while maintaining the same √2 aspect ratio. That mathematical consistency means an A4 print scales perfectly to A3 without any cropping. It’s one of the most elegant features of the system and a genuine advantage for artists working across multiple print sizes.
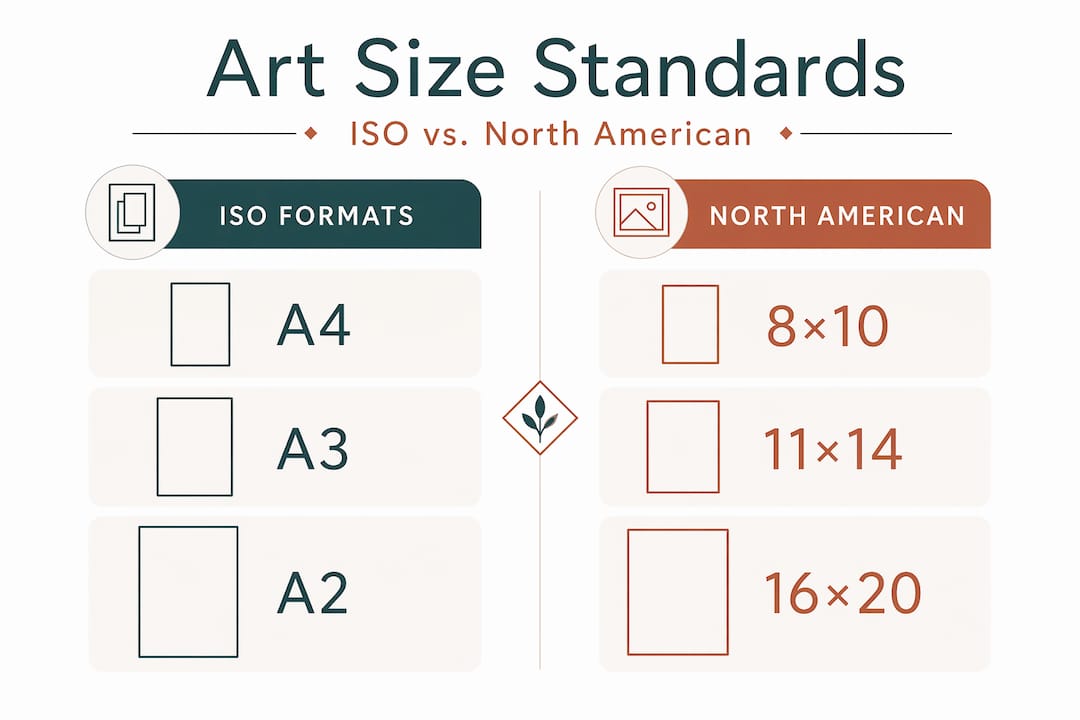
| Format | Dimensions | Common use |
|---|---|---|
| A5 | 148 × 210 mm | Small prints, greeting cards |
| A4 | 210 × 297 mm | Standard art prints, certificates |
| A3 | 297 × 420 mm | Posters, detailed illustrations |
| A2 | 420 × 594 mm | Large-scale prints, statement pieces |
| 8 × 10 in | 203 × 254 mm | Portrait photography, home display |
| 11 × 14 in | 279 × 356 mm | Gallery walls, medium focal pieces |
| 16 × 20 in | 406 × 508 mm | Large prints above furniture |
| 24 × 36 in | 610 × 914 mm | Oversized feature artwork |
North American sizing works entirely in inches, and the most popular frame sizes are 4×6, 5×7, 8×10, 11×14, 16×20, and 24×36. These cover the vast majority of ready-made frame sales and map to common photographic print ratios.
European canvas sizing adds a third system. Traditional canvas formats come in three families. F (Figure) for portraits, P (Paysage) for landscapes, and M (Marine) for seascapes. Each family has its own proportional logic, so a 20F canvas has different dimensions to a 20P canvas even though they share the same numeric designation.
Sticking to standard sizes, whether ISO, North American, or canvas families, gives you one enormous practical advantage: off-the-shelf frames. The moment you deviate into custom dimensions, you’re looking at bespoke framing costs that can dwarf the price of the artwork itself.
Calculating your frame size from artwork and mat
This is where most framing mistakes actually happen, not in choosing the wrong style of frame but in getting the numbers wrong.
Start by measuring your print or artwork precisely. Use a steel rule rather than a fabric tape measure, and measure to the nearest millimetre. Even a 2 mm error compounds when you add mat borders on both sides.
Follow these steps to calculate your frame size correctly:
- Measure your artwork. Note the exact width and height of the print or paper, not the image area but the full sheet.
- Decide on mat border width. For small prints up to A4, a border of around 38 to 50 mm (1.5 to 2 inches) works well. For medium prints up to A3, try 50 to 75 mm (2 to 3 inches). Large prints benefit from 75 to 100 mm (3 to 4 inches) of mat border.
- Apply the frame size formula. Frame size equals print size plus twice the mat border per dimension. An 8×10 inch print with a 2-inch mat border needs a 12×14 inch frame.
- Subtract for the rabbet overlap. The frame lip typically covers about 6 mm (a quarter of an inch) on each side, so your mat must be cut accordingly. If you ignore the rabbet, you risk the frame hiding part of your image or the mat not sitting flush.
- Confirm your aspect ratios match. An aspect ratio mismatch between print and frame is the single most common cause of framing problems, resulting in either cropping or awkward blank borders.
Pro Tip: Before ordering a print or frame, cut a paper template at your calculated frame outer size and hold it against your wall. It takes two minutes and can save you from returning the wrong size.
Avoid the common mistake of measuring an old frame’s outer dimensions when replacing it. The outer size tells you nothing useful about the artwork it can hold. Always measure the artwork first, then work outward.
Preparing digital files for print
Getting your digital file right before sending it to print is a step many artists skip, and then wonder why their artwork looks soft or slightly cropped when it arrives.
The standard for quality print reproduction is 300 DPI (dots per inch) at the intended output size. DPI describes how many ink dots the printer lays down per inch, and 300 is the threshold at which the human eye stops seeing individual dots at normal viewing distance.
Here’s what that means practically:
- A 16×20 inch print at 300 DPI requires a file with 4,800×6,000 pixels. Short of that and you’ll see pixelation, especially in smooth gradients or fine details.
- The DPI setting alone in your file metadata is not enough. What matters is the actual pixel count. A file labelled 300 DPI but sized at 500×600 pixels will still print badly at large sizes.
- If your pixel count falls short of the requirement, you have two options: resize the output (print smaller) or upscale the file using software such as Adobe Photoshop or Topaz Gigapixel AI. Upscaling has limits, but it can extend a file’s usable print range by 20 to 30 per cent without visible quality loss.
- Your file’s aspect ratio must match your target print size precisely. Sending a 4:3 image to be printed at 5:4 (such as 8×10 inches) will either stretch the image, crop it, or leave white borders, none of which is acceptable for finished art.
Pro Tip: Work in this order. Choose your final frame ratio first, then export your digital file at exactly that ratio and resolution, then verify the pixel dimensions before uploading to a print service.
Choosing the right size for your space
Knowing the technical dimensions is only half the work. The other half is understanding how art interacts with the space around it. You can read our art print sizing guide for a deeper visual breakdown, but these principles cover the essentials.
The most widely used rule in interior design is the 60 to 75 per cent guideline. Art hung above furniture should span roughly 60 to 75 per cent of the furniture’s width. If your sofa is 213 cm (84 inches) wide, you’re looking for artwork between 127 and 160 cm (50 to 63 inches) wide. Going narrower makes the piece look lost. Going wider overwhelms the furniture and breaks the visual relationship.
For gallery walls, the rules are different:
- Start with your largest piece off-centre rather than in the middle. It creates more visual tension and looks more considered.
- Mix frame sizes but keep a consistent mat colour or frame finish to hold the arrangement together. You can find detailed advice on coordinating prints and frames to make a gallery wall feel intentional rather than random.
- Leave equal gaps between frames, typically 5 to 7 cm, to keep the composition readable.
When choosing between standard and oversized formats, think about ceiling height. Low ceilings paired with very tall art feel oppressive. High ceilings can absorb oversized pieces with ease and often demand them to avoid the art looking miniature against the wall. The case for oversized prints is genuinely strong in large living areas and commercial spaces where standard sizes simply disappear. You can also find useful bedroom-specific advice on decorating without overwhelming the space, particularly when matching art scale to the size of the room.
Finally, measure twice and tape once. Using painter’s tape to mark the footprint of your intended artwork on the wall before ordering is the single most effective way to avoid buying the wrong size.
My honest take on art format sizing
I’ve watched artists and homeowners make the same expensive mistake repeatedly: they treat the artwork, the mat, and the frame as three separate decisions rather than one connected chain. The art format sizing process only works when you plan all three together from the start.
The conventional advice says to pick a print size first and work outward. In my experience, that’s backwards for most people. Start with the wall. Measure the space, decide the outer frame size that works visually, then back-calculate the mat border and visible image area. That order surfaces sizing problems before you’ve spent anything.
I’ll also push back gently on the obsession with standard sizes. Yes, they simplify framing. But I’ve seen genuinely striking rooms where a custom-sized canvas at an unusual proportion became the focal point precisely because it didn’t conform. Standard sizes are a convenience, not a rule. The framing math works just as well at any proportion, provided you check your ratios carefully.
The single most underrated step in the whole process? Printing a low-cost draft before ordering the final piece. A £3 print at a copy shop at the correct dimensions, taped to the wall at the right height, tells you more than any visualisation tool.
— Lennard
Explore art sized for your space at Frametheworld
Understanding art format sizing is one thing. Finding artwork that actually fits your vision and your walls is where the real satisfaction comes from. At Frametheworld, the collections are curated with real display contexts in mind, not just aesthetics on a screen.
The Wabi Sabi wall art collection offers hand-painted abstract textures in a range of formats that sit beautifully in standard A3, A2, and 16×20 inch frames. If you prefer bold, high-contrast work, the Pop Art collection brings retro and contemporary pieces in statement sizes perfect for gallery walls or oversized feature displays.
Every piece on Frametheworld can be browsed by size and format, making it straightforward to find artwork that matches your calculated frame dimensions rather than adapting your framing to fit whatever you happen to find.
FAQ
What does art format sizing mean?
Art format sizing refers to the process of selecting compatible dimensions for your artwork, mat, and frame so they work together as a single display system. It covers everything from digital file resolution through to the outer frame size and wall placement.
What frame size do I need for an 8×10 inch print with a mat?
With a standard 2-inch mat border, an 8×10 inch print requires a 12×14 inch frame. The formula is print size plus twice the mat border width per dimension, minus the small rabbet overlap of roughly a quarter of an inch on each side.
What resolution do I need for a quality art print?
300 DPI at the intended print dimensions is the standard for print-quality artwork. A 16×20 inch print, for example, requires a digital file of at least 4,800×6,000 pixels to reproduce cleanly without pixelation.
Why does my print look cropped inside the frame?
Cropping is almost always caused by a mismatch between the aspect ratio of your print and the aspect ratio of your frame. For example, placing a 4:3 image in a 5:4 frame forces the printer or framer to crop the image to fill the space. Always confirm that your print and frame share the same aspect ratio before ordering.
What is the best art size to hang above a sofa?
Artwork hung above a sofa should ideally span 60 to 75 per cent of the sofa’s width. For a standard 213 cm sofa, this puts the ideal artwork width between roughly 127 and 160 cm. Going narrower makes the piece look undersized relative to the furniture beneath it.


Leave a comment
This site is protected by hCaptcha and the hCaptcha Privacy Policy and Terms of Service apply.