

Selecting artwork that truly transforms a high-profile space is far more complex than simply picking what looks good on a screen. For interior designers in urban centres, balancing ambitious client visions with the reality of physical site constraints demands expertise and foresight. This guide walks you through the process of defining project objectives and spatial constraints so each large-scale art commission becomes a strategic asset, not just a decorative afterthought.
Table of Contents
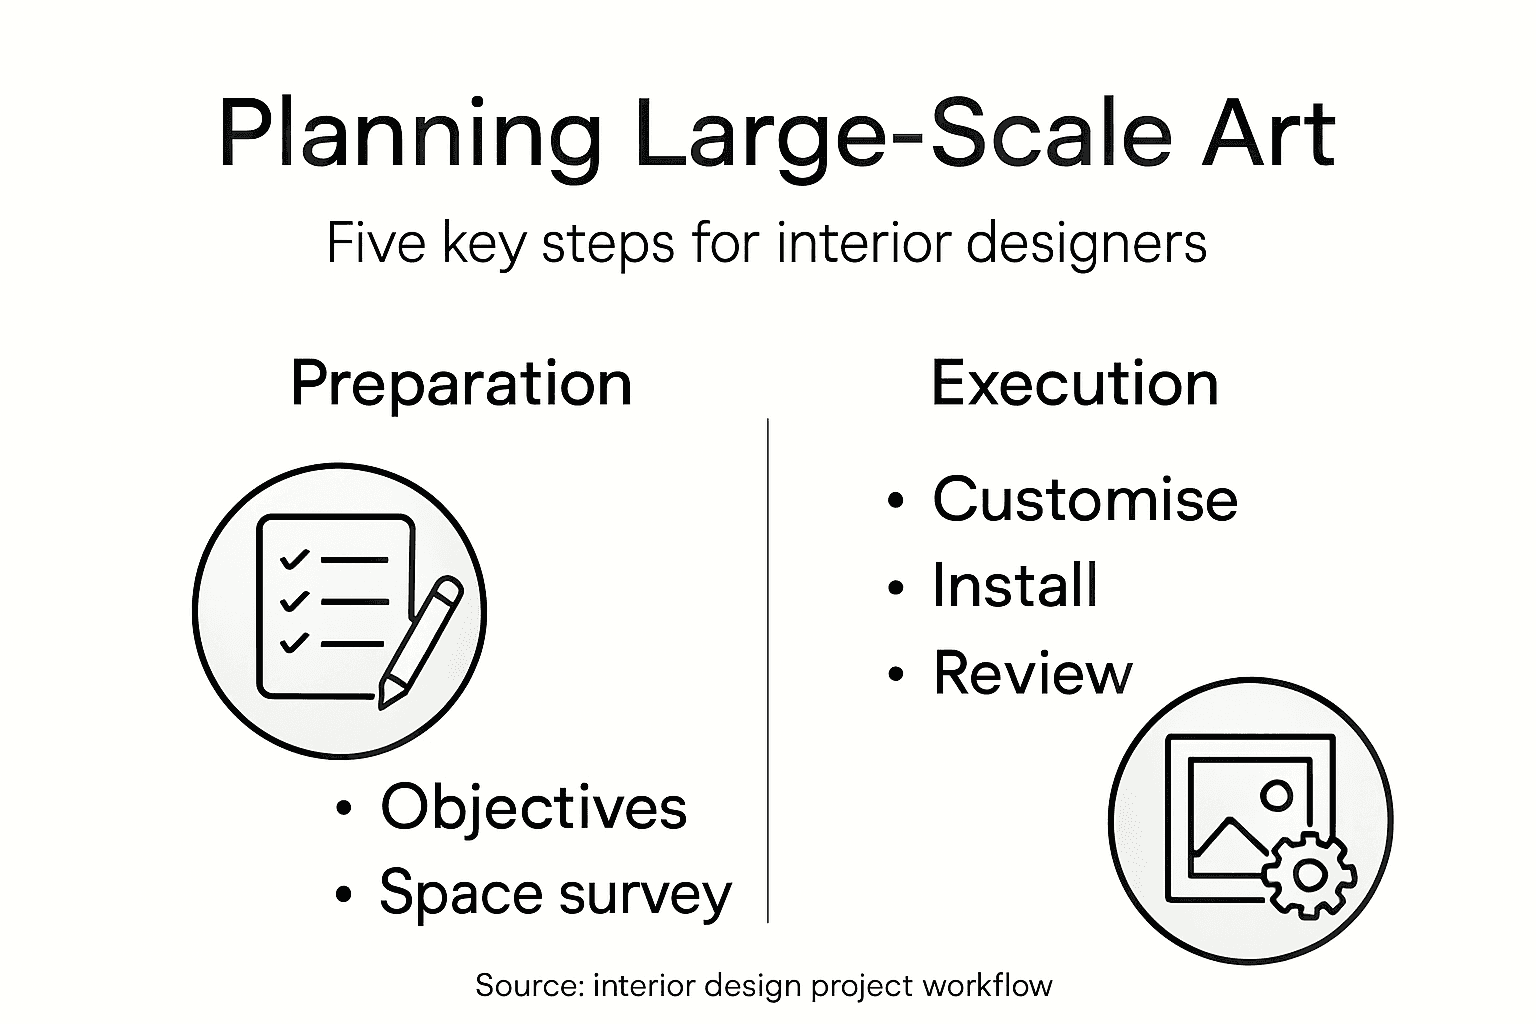
- Step 1: Determine Project Objectives And Spatial Constraints
- Step 2: Select Suitable Artwork Styles And Formats
- Step 3: Customise And Commission Large Scale Pieces
- Step 4: Assess Installation Logistics And Site Requirements
- Step 5: Verify Alignment And Quality Of Completed Display
Quick Summary
| Key Point | Explanation |
|---|---|
| 1. Define Objectives Clearly | Establish what the artwork needs to achieve and its intended emotional impact to align with your project’s goals. |
| 2. Document Spatial Constraints | Accurately capture wall dimensions, lighting, and architectural features to avoid costly design errors. |
| 3. Select Appropriate Styles | Match artwork styles to client preferences and spatial requirements for optimal visual harmony and impact. |
| 4. Coordinate Installation Logistics | Conduct a detailed site audit and prepare an installation plan to ensure smooth delivery and compliance with regulations. |
| 5. Perform Quality Verification | Inspect finished installations against standards and client expectations to ensure satisfaction and address any issues promptly. |
Step 1: Determine project objectives and spatial constraints
Before you source or commission any large-scale artwork, you need to establish exactly what your project aims to achieve and where the art will live. These two elements form the foundation of every successful installation. Without clear objectives and honest constraints, you risk selecting pieces that look beautiful on mood boards but fail in the actual space.
Start by defining your project objectives. What is the art meant to do? Is it a focal point that commands attention, a subtle backdrop that softens harsh commercial interiors, or a statement piece that reinforces your client’s brand identity? Different objectives demand different scales, styles, and materials. A piece designed to energise a startup office calls for boldness; one destined for a healthcare setting requires calm and accessibility.
Engage with your client deeply about their vision. What emotional response should visitors have? What practical functions must the art serve alongside its aesthetic purpose? This conversation shapes everything that follows. When you understand design briefs and stakeholder engagement, you gain clarity on what success truly looks like for the project.
Next, document your spatial constraints thoroughly:
- Wall dimensions and shape (flat, curved, angled)
- Ceiling height and distance from viewing points
- Natural and artificial lighting conditions at different times
- Architectural features that compete for visual attention
- Building codes, fire safety regulations, and weight restrictions
- Access points for installation and future maintenance
Measure twice. Photograph the space from multiple angles and heights. Note where foot traffic concentrates and where people pause. Does sunlight wash across the wall at noon? Does evening light create glare? These details matter enormously when selecting or commissioning artwork.
Balancing project scope with spatial understanding ensures you avoid costly mistakes during execution. A stunning mural means nothing if installation logistics weren’t considered upfront.
Clear objectives and precise spatial data prevent expensive redesigns and installation delays.
Document everything in a project brief that you can reference throughout the design process. Include photographs, measurements, lighting diagrams, and written descriptions. This becomes your shared reference point with your client, artists, and installation teams.
Pro tip: Create a detailed site visit checklist before you measure anything, then photograph the space with your phone from eye level, sitting level, and standing at full height to capture how viewers at different positions will perceive the artwork.
Step 2: Select suitable artwork styles and formats
Now that you understand your client’s vision and spatial reality, it’s time to narrow down the actual styles and formats that will work. This step bridges your project objectives with tangible artwork selections that your client can visualise and approve.
Start by considering the overall aesthetic direction. Does your client lean towards contemporary, minimalist, abstract, figurative, or something else entirely? The style should complement the existing interior without competing for attention unless that’s precisely the goal. A modern office tower might demand clean lines and bold colour, whilst a heritage property calls for something that respects its character.
Think about format and scale simultaneously. Will you commission a single statement piece or create impact through a series of smaller works? Large-scale contemporary artworks benefit from technological advancements that enable new production methods and display possibilities. Your format choices depend partly on what’s practically achievable within your budget and timeline.
Consider these format options:
- Single large canvas or mural that dominates the space
- Diptych or triptych for visual rhythm and movement
- Gallery wall arrangement with multiple coordinated pieces
- Custom bespoke commission tailored to exact dimensions
- Modular panels that can be reconfigured if needed
Material choices matter significantly. Canvas, acrylic, print on metal or fabric, wallpaper murals, and framed photographs each create different visual weights and maintenance requirements. A healthcare facility might require washable surfaces; a gallery space can accommodate more delicate mediums.
Here is a comparison of common large-scale artwork formats and where each excels:
| Format Type | Best Suited For | Visual Impact |
|---|---|---|
| Single Statement Piece | Reception areas, open lobbies | High, draws attention |
| Series/Modular Panels | Corridors, flexible offices | Moderate, flexible layout |
| Gallery Wall | Hospitality, creative spaces | Dynamic, layered effect |
| Bespoke Commission | Brand-critical environments | Tailored, highly unique |
When selecting artwork styles, reference your client’s brand identity, existing colour palette, and lighting conditions from Step 1. Does the art need to energise the space or provide visual calm? Proper wall art selection ensures you choose pieces that serve both aesthetic and functional purposes.
The best artwork style is one that aligns perfectly with your client’s objectives and enhances the spatial experience.
Create a mood board with 3-5 style directions. Show your client various approaches so they can articulate preferences clearly. This prevents expensive revisions later and builds confidence in your recommendations.
Pro tip: Request high-resolution digital mockups of potential artwork styles placed directly on photographs of the actual space, then adjust scale and positioning based on how colours interact with natural light throughout the day.
Step 3: Customise and commission large scale pieces
With your style direction confirmed, it’s time to move into the customisation and commissioning phase. This is where your vision becomes tangible through direct collaboration with artists, fabricators, or design studios who understand large-scale execution.
Start by defining your customisation parameters clearly. What aspects of the artwork can be tailored? Dimensions obviously, but also colour palette, composition, materials, and finishing techniques. Some artists prefer complete creative freedom within broad guidelines; others welcome detailed input at every stage. Establish this upfront to avoid misaligned expectations.
Material selection, design collaboration, and fabrication techniques form the foundation of a successful commission. Discuss whether the piece needs UV protection, weather resistance, or specific mounting requirements. These decisions affect both cost and timeline significantly.
When briefing potential artists or studios, include:
- Exact dimensions and wall specifications
- High-resolution reference images and mood boards
- Brand guidelines or colour requirements
- Budget parameters and payment schedule
- Installation timeline and access constraints
- Maintenance expectations post-installation
Request detailed proposals that outline their customisation process, timeline, and any revision rounds included. A clear proposal prevents scope creep and costly surprises. Be specific about what “final approval” means.
Balancing artistic vision with practical constraints ensures your commissioned piece meets both creative aspirations and real-world feasibility. Some design ideas look stunning on paper but prove logistically impossible or prohibitively expensive to fabricate.
Transparent communication about budget, timeline, and practical limitations prevents disappointment and rework.
Build revision rounds into your contract. Most commissions benefit from 1-2 rounds of adjustments before final fabrication begins. Once production starts, changes become exponentially more costly.
Request samples or mockups before full production. Digital renderings are helpful, but physical samples of materials, colours, and finishes give your client confidence in the final outcome.
Pro tip: Specify a detailed production timeline with clear milestones (design approval, material sourcing, fabrication start, quality checks) and require the artist to provide photographic documentation at each stage so you can catch issues early.
Step 4: Assess installation logistics and site requirements
Before your artwork arrives at the site, you need to ensure the space is genuinely ready to receive it. Installation logistics and site assessment aren’t glamorous, but they’re absolutely critical to success. Missing details here create costly delays, damage, or unsafe conditions.
Begin with a comprehensive site audit. Visit the location with a checklist and take measurements again, even if you did this in Step 1. Conditions change. Has new equipment been installed? Are there structural changes? Verify wall integrity, electrical access points, and ceiling load capacity if you’re hanging large pieces.
Document environmental factors that affect the artwork. Check humidity levels, temperature fluctuations, and exposure to direct sunlight at different times of year. A print that fades rapidly in bright light might not suit a south-facing wall. Some materials contract and expand with temperature changes, affecting mounting stability.
Installation logistics and accessibility requirements directly impact how you’ll hang the artwork and whether your team can safely access all areas. Measure doorway widths, stairwell clearances, and lift capacity if the piece must travel through building systems.
Assess these logistical factors:
- Physical access routes for artwork delivery and installation crew
- Wall preparation needed (patching, priming, levelling)
- Electrical or structural support requirements
- Temporary protective coverings for surrounding areas
- Parking and loading dock availability on installation day
- Time restrictions or noise limitations from building management
Site-specific factors including spatial dimensions and regulatory compliance ensure your installation meets legal requirements and safety standards. Check building codes, fire regulations, and accessibility standards that apply to your jurisdiction.
Coordinate with building management, facilities teams, and any other contractors working in the space. Misaligned schedules cause conflict and expensive delays.
Thorough site assessment prevents installation day surprises and protects both your reputation and your client’s investment.
Create a detailed installation plan that maps exactly where the artwork goes, how it’s mounted, and what tools and personnel you’ll need. Share this plan with all stakeholders before installation begins.
Pro tip: Schedule a pre-installation walkthrough with your installation team at least one week before the date so they can identify potential obstacles, confirm access routes, and arrange any equipment or materials in advance.
Step 5: Verify alignment and quality of completed display
The artwork is hung, the installation team is packing up, and you’re tempted to call the job done. Stop. This is when you conduct a thorough verification that everything meets your original objectives and quality standards. Skip this step and problems emerge after your client takes ownership.
Begin your quality inspection immediately after installation, before the installation team leaves. Check that the artwork is level, secure, and positioned exactly as planned. Use a spirit level, measuring tape, and reference marks you established during planning. A frame that’s even slightly crooked will drive your client mad and damage your reputation.
Examine the artwork surface closely from multiple distances and angles. Look for scratches, dust, fingerprints, or any damage sustained during handling. Proper quality control processes and design intent adherence ensure the finished installation matches your client’s expectations and your project vision.
Review these key quality checkpoints:
- Horizontal and vertical alignment using a level
- Surface condition including scratches, marks, or damage
- Mounting security and hardware integrity
- Lighting effectiveness on the artwork
- Sightlines from primary viewing areas
- Gaps or spacing if multiple pieces are grouped
- Cleanliness of walls and surrounding areas
Take professional photographs from the same angles you used in your initial site visit. These create a before-and-after record and serve as documentation for your portfolio. Photograph in natural light and under the space’s artificial lighting conditions.
Detailed reviews and quality assurance confirm installations align with project goals and spatial constraints before final sign-off. Ask your client to walk through the space with you. Point out what makes the installation successful and address any concerns immediately.
A quality verification conducted with your client present builds confidence and prevents post-installation disputes.
Don’t assume everything is correct. Verify every element against your project brief. Has the artwork achieved the emotional impact intended? Does it enhance the space as predicted? Do practical functions (wayfinding, branding, spatial division) work as designed?
Document any minor touch-ups needed and schedule those before final handover. Address issues whilst your team is mobilised, not weeks later when reassembly costs multiply.
Pro tip: Create a comprehensive punch list with your client during the walkthrough, photograph any issues with annotations, and confirm a timeline for addressing each item before you consider the installation truly complete.
The following table summarises the key stages of the large-scale art commissioning process and their main focus:
| Stage | Primary Focus | Key Outcome |
|---|---|---|
| Define Objectives & Constraints | Project intent and site limitations | Clear brief for all stakeholders |
| Select Styles & Formats | Visual direction and feasibility | Approved concept and materials |
| Customise & Commission | Artist collaboration and production | Artwork meeting all requirements |
| Installation Planning | Site logistics and compliance | Safe, seamless artwork delivery |
| Quality Verification | Inspection and client satisfaction | Successful, defect-free handover |
Elevate Your Interior Design with Large-Scale Art Solutions
Planning large-scale artwork for interior spaces involves overcoming challenges such as defining precise project objectives, understanding spatial constraints, and selecting styles that enhance the environment without overwhelming it. The article highlights the importance of clear briefs and careful collaboration to avoid costly mistakes and ensure the artwork delivers the desired emotional and functional impact. Whether you are aiming to create a statement piece or a cohesive gallery wall, balancing artistic vision with practical considerations is key.
At Frametheworld.co.uk, we understand these challenges and offer a curated selection of high-quality wall art designed to fit a variety of interiors. Explore our Vertical Wall Art – Hand-Painted Modern Art Pieces to find elegant formats that work beautifully in commercial or residential spaces demanding clean lines and bold presence. For textures that add depth and subtlety, our Plaster Art Texture Paintings – Modern Wall Art provide tactile interest ideal for creating calm yet sophisticated atmospheres.
Take the next step towards flawless installations by browsing our collections or discussing bespoke customisation options tailored to your project needs. Discover how Frametheworld.co.uk can turn your design visions into stunning reality today.
Frequently Asked Questions
How do I determine the objectives for a large-scale art project?
Begin by discussing with your client the intended impact of the artwork. Identify whether it should serve as a focal point, backdrop, or brand statement, and document these objectives to guide your selections.
What spatial constraints should I consider when planning large-scale art?
Assess wall dimensions, ceiling height, lighting conditions, and any architectural features in the space. Thoroughly documenting these factors ensures that the selected artwork fits the environment and avoids installation challenges.
How can I select suitable styles and formats of artwork?
Evaluate your client’s aesthetic preferences and the nature of the space to identify the right styles. Create a mood board showcasing 3-5 directions and involve your client in selecting the final direction to enhance satisfaction with the final choices.
What key elements should be included when commissioning custom artwork?
Clearly outline dimensions, colour specifications, and budget parameters while collaborating with artists. Include a schedule for revisions, ensuring all parties understand expectations to prevent misunderstandings during the commissioning process.
How should I assess installation logistics for large-scale artwork?
Conduct a comprehensive site audit to confirm access routes and verify wall integrity. Create a detailed installation plan that maps out mounting techniques and ensures the area is prepared for artwork delivery.
What steps should I take to verify the quality of the completed artwork installation?
Perform a thorough inspection to check alignment, surface condition, and mounting security as soon as the artwork is installed. Document any necessary touch-ups and schedule them immediately to ensure client satisfaction and project success.

Leave a comment
This site is protected by hCaptcha and the hCaptcha Privacy Policy and Terms of Service apply.