

TL;DR:
- A structured workflow ensures that art installations in residential or commercial spaces meet design and safety standards. Proper site assessment, mockups, and client verification are essential to prevent costly errors and delays. Anticipating challenges and maintaining detailed documentation lead to successful, long-lasting displays.
A decorative art installation workflow is the structured process of planning, preparing, and executing the placement of art in residential or commercial spaces to achieve visual coherence and lasting impact. Interior designers and property developers who skip this process risk misaligned pieces, site damage, and costly rework. The industry term used by museum preparators and professional handlers is “installation workflow,” and it applies equally to a single residential commission and a multi-floor commercial scheme. This guide covers every phase, from site assessment through final verification, so you can deliver installations that hold up to client scrutiny.
What does a decorative art installation workflow require before you start?
Preparation is the phase most designers underestimate. Environmental controls such as lighting levels, temperature, and humidity must be documented in a central checklist from the project’s outset. Skipping this step creates problems that surface only after artwork is fixed to the wall, at which point remediation is expensive.
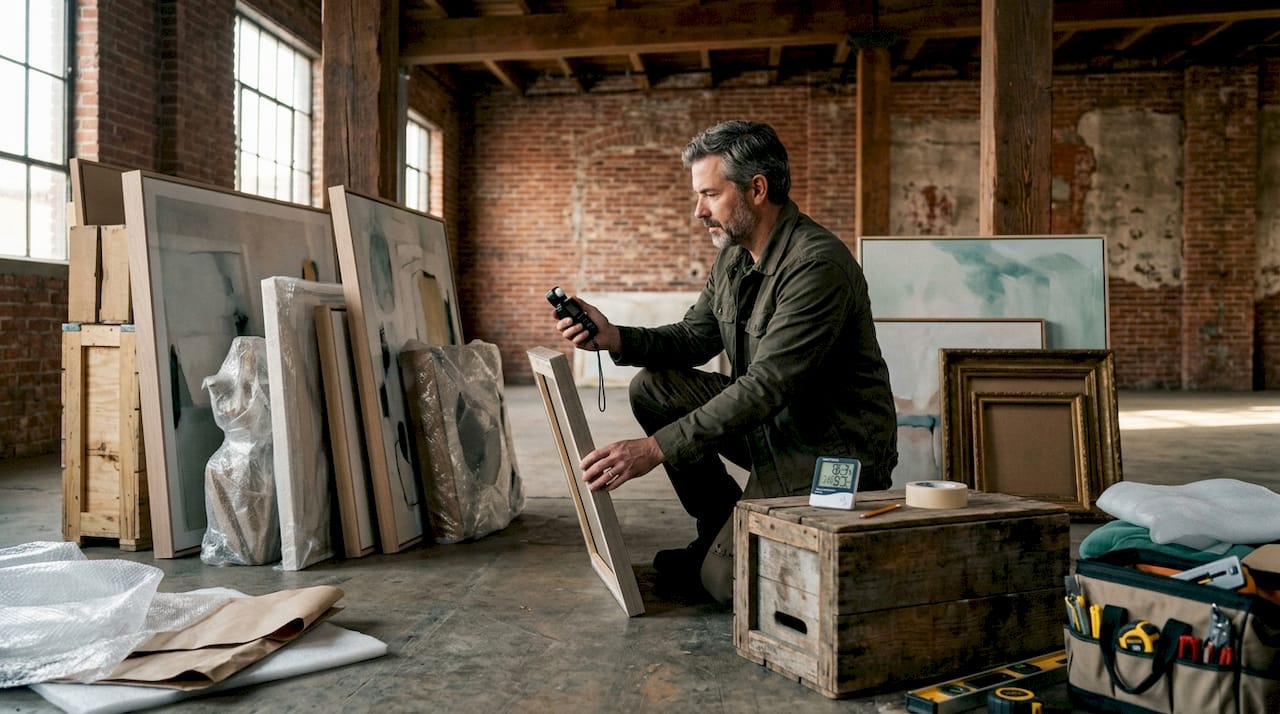
Physical tools and equipment
Every art installation process requires a core toolkit before anyone touches a piece. Precision measuring devices, spirit levels, laser levels, and stud finders are non-negotiable for accurate placement. For larger or heavier works, lifts, pallet trucks, and shoring equipment provide the mechanical advantage needed to position pieces safely without wall or floor damage.
Essential physical tools include:
- Laser level and spirit level for horizontal and vertical alignment
- Steel measuring tape and folding rule for spacing accuracy
- Stud finder and wall anchor kit for load-bearing fixings
- Protective gloves, cotton handling gloves, and corner guards
- Pallet truck or trolley for moving crated or heavy works
- Floor protection boards and blankets to prevent surface damage
Site readiness and access
Site access is a logistical constraint, not an afterthought. Confirm lift dimensions, door widths, and corridor clearances before delivery day. If a work requires scaffolding or a cherry picker, book it alongside the installation crew, not after arrival.
Environmental and documentation requirements
Lighting, temperature, and humidity directly affect both the artwork and the adhesive or fixings used. Capture baseline readings on your checklist and recheck them on installation day. A single checklist document, shared with all stakeholders, prevents the miscommunication that derails schedules.
Pro Tip: Create a site-specific environmental log that records temperature and humidity at the start and end of each installation day. This protects you if a client later queries condition changes in the artwork.
| Prerequisite | Why it matters |
|---|---|
| Lighting assessment | Confirms glare, shadow, and colour rendering before fixing |
| Humidity and temperature log | Protects art and ensures adhesives cure correctly |
| Access route survey | Prevents damage to crates, frames, and building fabric |
| Shared checklist document | Keeps all parties aligned on requirements and sign-offs |
| Equipment booking confirmation | Eliminates delays caused by unavailable lifts or trucks |
What are the key steps to execute a decorative art installation effectively?
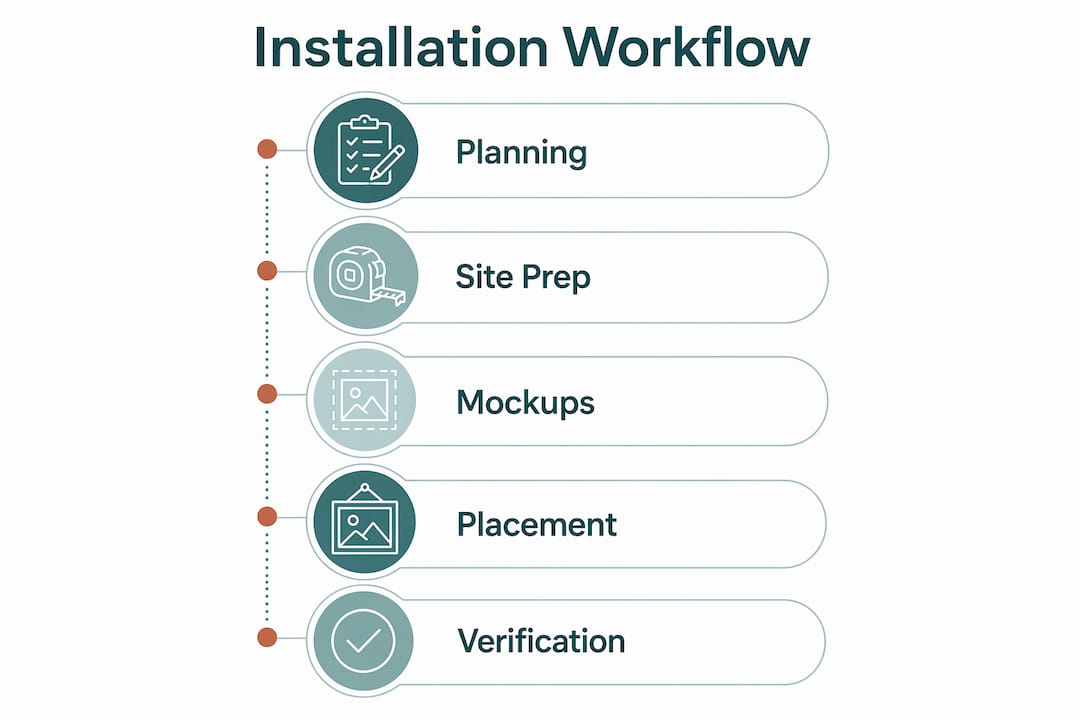
Execution follows a fixed sequence. Deviating from it, even on a small residential project, introduces errors that compound. The steps below reflect the approach used by professional preparators on medium-scale projects, where museum workflows typically allocate 6 days for unpacking and site preparation and a further 8 days for installation. Commercial and residential timelines are shorter, but the sequence is identical.
-
Unpack and condition-check every piece. Remove works from crates or packaging in a clean, padded area. Photograph each piece before and after unpacking. Note any transit damage in writing and share with the client immediately.
-
Cross-reference against the placement plan. Match each work to its designated location using your floor plan or elevation drawings. Label the reverse of each piece with its position reference so crew members can identify placements without guesswork.
-
Create low-fidelity mockups for scale and positioning. Tape, thread, or paper templates fixed to the wall let you verify scale and spacing against architectural features before a single fixing goes in. This step catches proportion errors that drawings miss.
-
Adapt to site-specific constraints. Walls are rarely perfectly plumb, and skirting boards, cornices, and service runs affect placement. Treat the installation as an active, evolving practice that requires on-the-day interpretation, not rigid adherence to a plan drawn months earlier.
-
Fix artwork using the specified method. Use the fixing type specified for each wall substrate: picture rail hooks for plaster, masonry anchors for brick or block, and proprietary adhesive strips only where the manufacturer’s load rating matches the artwork weight. Never substitute fixings without client approval.
-
Conduct an immediate quality check. Step back to the room’s primary viewing position and assess alignment, spacing, and visual balance. Use a laser level to confirm horizontal runs. Photograph the finished installation from the same angles used in the original design presentation.
Pro Tip: For gallery-style groupings, cut paper templates to the exact dimensions of each piece and arrange them on the floor first. This lets you finalise the composition without lifting a single frame.
For residential projects, the art selection checklist you build before procurement directly informs the placement plan you execute here. The two documents should cross-reference each other.
How do you manage common challenges during installation?
Every installation project encounters at least one problem that was not in the plan. The professionals who handle these well are those who anticipated the most likely failure points before arriving on site.
Delays most commonly arise from misalignment between the master schedule and site readiness, including equipment availability and environmental conditions. This means the schedule you agreed with the client is only as reliable as the site conditions on the day.
Common challenges and how to address them:
- Access bottlenecks. A lift that is too small or a corridor under concurrent trade works can halt an entire day’s installation. Confirm access routes 48 hours before arrival and have a contingency sequence ready so crews can work on accessible areas while blockages are resolved.
- Environmental inconsistencies. HVAC systems that were off during your site survey may be running on installation day, changing temperature and humidity readings. Recheck conditions on arrival and pause if readings fall outside the agreed range for sensitive works.
- Scheduling conflicts with other trades. Electricians, joiners, and decorators often share the same site. Coordinate directly with the site manager to protect your installation windows, particularly for works that require dust-free conditions.
- Misalignment discovered after fixing. If a piece is off-level or incorrectly spaced after fixing, remove it immediately rather than adjusting around it. Patching and re-fixing is faster than trying to correct a composition that is fundamentally wrong.
“Aligning the master schedule with site readiness, including equipment availability and environmental management, is the single most effective way to prevent costly delays on an art installation project. Build contingency time into every phase, not just the final day.”
For large or complex pieces, safe artwork transport to the site is itself a workflow phase. Damage in transit undoes all the preparation that preceded it.
Which verification methods confirm a successful installation?
Verification is not a formality. Inspection and documentation during and after installation confirm that the work meets client requirements and safety standards. Skipping this phase leaves you exposed if a client raises concerns weeks later.
The most reliable verification method combines a structured checklist with photographic evidence. Walk the space with your placement plan and tick off each piece against its specified position, fixing method, and condition. Photograph every work from the primary viewing distance and from a 45-degree angle to capture the fixing and frame condition.
Collaboration with the client or their representative at this stage is not optional. Their sign-off on the completed installation is your protection against retrospective disputes. Schedule a formal walkthrough rather than sending photographs and hoping for approval by email.
Ongoing monitoring matters for sensitive works. Artworks in spaces with variable natural light or fluctuating HVAC performance can shift in appearance over weeks. Advise clients to log any changes and schedule a follow-up visit at 30 days post-installation for high-value commissions.
| Verification step | Purpose |
|---|---|
| Checklist walkthrough | Confirms each piece matches the placement plan |
| Photographic record | Provides dated evidence of condition and position |
| Client sign-off walkthrough | Validates design intent and protects against disputes |
| Fixing and load check | Confirms safety compliance for each artwork |
| 30-day follow-up visit | Identifies any environmental or structural changes |
For guidance on how installed art should relate to the broader interior, the wall art placement guide for developers covers spatial relationships and scale in detail.
Key takeaways
A structured decorative art installation workflow, built around environmental documentation, low-fidelity mockups, and formal client verification, is the most reliable way to deliver installations that meet design intent and withstand professional scrutiny.
| Point | Details |
|---|---|
| Document environment early | Log lighting, temperature, and humidity before installation begins, not on the day. |
| Use mockups before fixing | Tape or paper templates confirm scale and spacing without committing to permanent fixings. |
| Align schedule with site | Confirm access, equipment, and environmental conditions 48 hours before arrival to prevent delays. |
| Verify with evidence | Combine a checklist walkthrough with dated photographs and a formal client sign-off. |
| Plan for adaptation | Treat every installation as a live process that requires on-site judgement, not just plan execution. |
Why I think most installation problems are planning problems in disguise
The installations I have seen go wrong rarely fail at the fixing stage. They fail weeks earlier, when someone assumed the site would be ready, the environment would be stable, or the client’s approval of a mood board counted as approval of a placement plan. Those assumptions are expensive.
The concept of treating artwork installation as an active practice requiring adaptable, written instructions is one I return to on every project. A rigid plan that cannot flex to a plumb wall or a last-minute lighting change is not a plan. It is a liability.
The most underused tool in a designer’s kit is the low-fidelity mockup. Cutting paper templates and pinning them to a wall takes 20 minutes. It has saved me hours of re-fixing and repainting on projects where the drawings looked perfect but the reality of the space was different. Clients also respond well to seeing the composition before commitment. It builds confidence and reduces the scope for retrospective objections.
My honest advice: build your environmental checklist before you select the art, not after. The art display guide approach of working from space conditions outward, rather than from artwork inward, produces installations that hold up over time. The sequence matters more than any individual decision within it.
— Lennard
How Frametheworld supports your installation projects
Frametheworld works with interior designers and property developers who need art that integrates cleanly into a defined scheme. The Wabi Sabi wall art collection offers hand-painted abstract pieces with natural texture and tonal depth, well suited to residential and hospitality schemes where warmth and restraint are the brief. For commercial and retail environments that call for visual impact, the Pop Art collection delivers bold, hand-painted works in formats that scale to large wall areas. Frametheworld also offers bespoke commissions, allowing you to specify dimensions, colour palette, and finish to match a placement plan precisely. Professional enquiries are handled directly, with guidance on sizing and format available before you commit.
FAQ
What is a decorative art installation workflow?
A decorative art installation workflow is the structured sequence of planning, site preparation, artwork placement, and verification used to install art in residential or commercial spaces. It covers everything from environmental assessment to client sign-off.
How long does a professional art installation take?
Timelines vary by scale. Medium-scale installations typically require 6 days for unpacking and site preparation plus 8 days for installation. Residential projects are shorter but follow the same sequence.
Why are mockups important in the installation process?
Paper or tape mockups confirm scale and spacing against real architectural constraints before permanent fixings go in. They prevent proportion errors that drawings at scale often miss.
What causes most delays on art installation projects?
Misalignment between the master schedule and site readiness is the most common cause, including unavailable equipment and environmental conditions that fall outside the agreed range.
How do you verify that an installation meets the client’s brief?
Combine a structured checklist walkthrough with dated photographic documentation and a formal client sign-off visit. For high-value commissions, schedule a follow-up inspection at 30 days post-installation to check for environmental or structural changes.

Laat een reactie achter
Deze site wordt beschermd door hCaptcha en het privacybeleid en de servicevoorwaarden van hCaptcha zijn van toepassing.